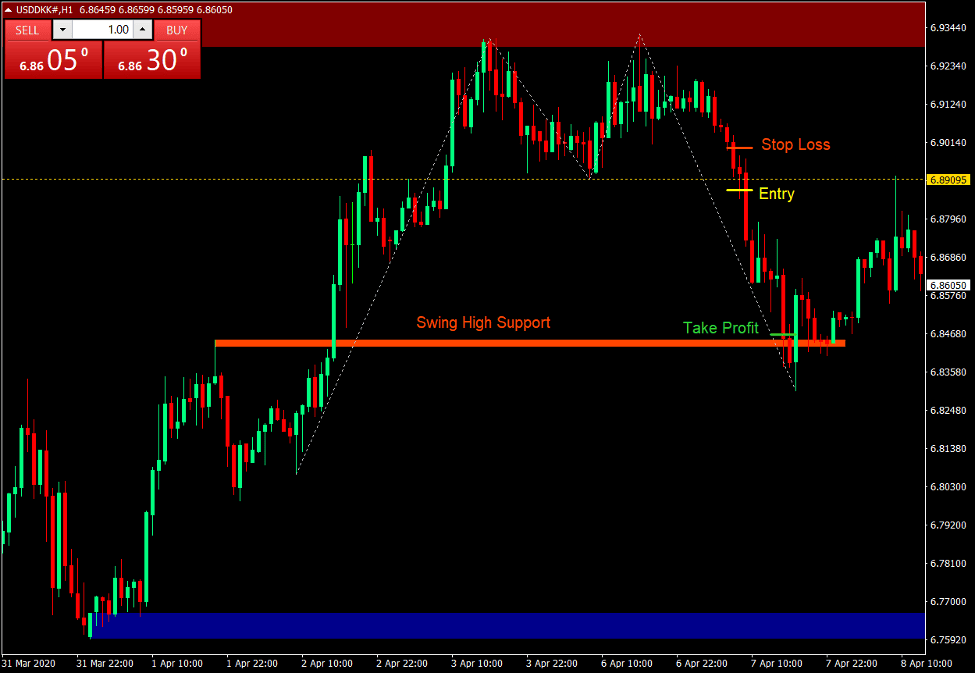
When it comes to trading, many new traders make the mistake of overcomplicating their trading plans. Many traders would be quickly attracted to any new thing that glimmers, whether it is a technical indicator, a trading strategy, a new money management strategy to ramp up profits or whatnot. Before they know it, their charts have become a cluttered mess looking more like a spaghetti rather than a price chart, and their trading plans have become a complicated textbook of rules.
Seasoned traders however know that trading success does not necessarily require complicated plans. Instead, they would rather keep it simple knowing that they could still get the same success without the same level of stress. Many would keep it as simple as having just one, two or maybe three indicators and look for a few key patterns. Simplicity is key.
One of the simplest forms of technical analysis trading is with the use of price pattern trading. These price patterns are formed on a price chart and seem to amazingly recur again and again. Although many traders may think these patterns are baseless and are formed out of sheer luck, these patterns do actually form because of the market’s psychology based on greed, fear and their beliefs of what is expensive and cheap. Because of this underlying causes, these patterns could signify a potential trend reversal or trend continuation.
Two of the most popular trend reversal patterns are the Double Tops and Double Bottoms, which we will be discussing here.
Double Top
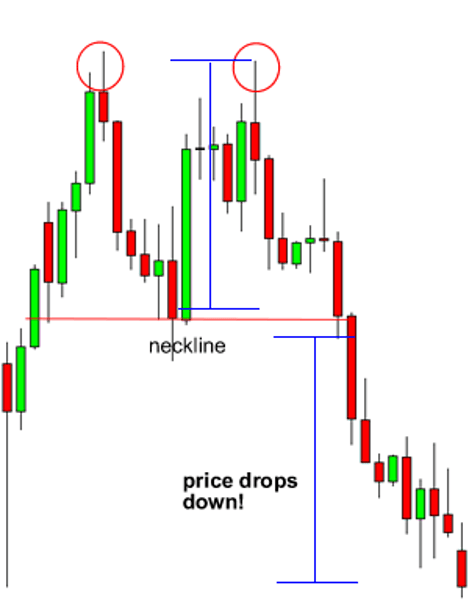
The Double Top is a simple bearish trend reversal pattern which works very well.
It is characterized by an initial strong bullish spike which is then followed by a slight reversal. This leg forms a swing high and a swing low. After the swing low, price would then try to push up but should fail breaking the high. This would then be followed by price dropping back down, breaching the swing low, and drop towards the starting point of the initial bullish spike.
This pattern is formed because after the second push moving up, traders realize that this swing high has now become a resistance level. The swing low could have been a support level, however as with any support level, price could break below this level with strong momentum. This could also be because traders see the starting point of the initial thrust as the more logical support level rather than the swing low in the middle of the pattern.
Traders can make a sell trade at the bounce on the swing high. However, this is still risky as the market can still range if the market would find the swing low as a support level. Thus, it is best to trade at the breakdown below the swing low.
Double Bottom
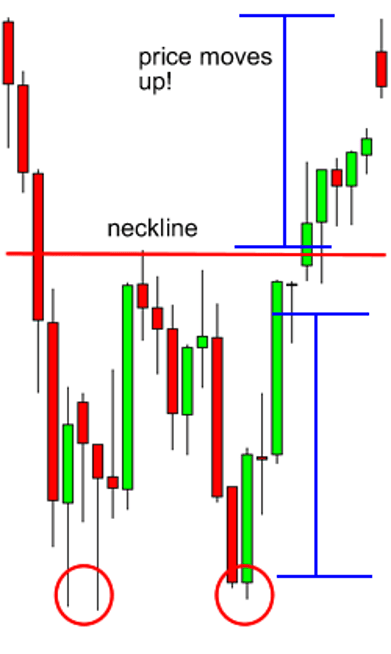
The Double Bottom is another effective bullish trend reversal price pattern, which is the exact opposite of the Double Top pattern.
Here, the pattern is initiated by a sudden strong drop, followed by a slight push back up forming the swing low and swing high. Then, price would again try to push down only to find the swing low as a support level. It then breaks above the swing high and moves toward the starting point of the initial drop.
Again, traders may start the trade at the bottom of the last thrust when price starts to find the prior swing low to be a support level. However, it is again very risky. The conservative way to trade this is after the breakout above the swing high targeting the next resistance level.
Supply and Demand Zones for Identifying Swing Points
The key to trading the Double Top and Double Bottom pattern properly is in correctly identifying the swing points.
The Supply and Demand zones plotted by the Supply and Demand indicator is based on the swing points the indicator detects. Thus making it an ideal match for this type of strategy.
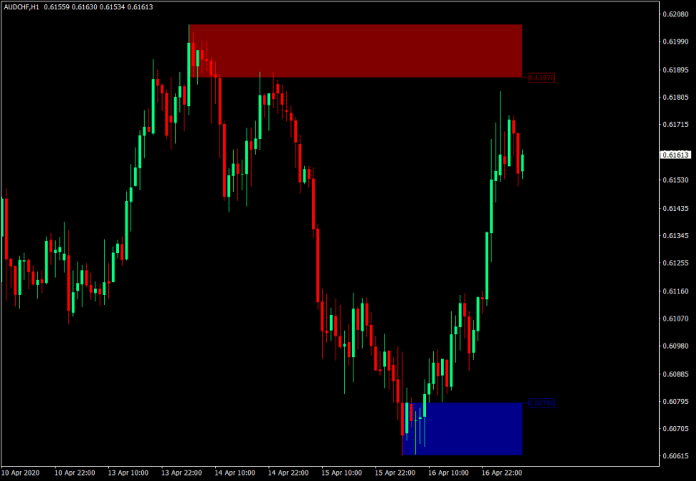
Supply Zones are basically areas in the map wherein price quickly reversed down from. The theory is that price should bounce back up from these zones if ever it reaches these levels again because there are many sellers willing to sell at this price point. This pattern can also be called an “M” pattern.
Demand Zones on the other hand are the exact opposite of Supply Zones. These are areas where price quickly bounced up from, with the theory that there are many buyers willing to buy at this price point. Traders may also call this a “W” pattern.
Identifying supply and demand zones may be difficult for new traders and it would require much screen time to master. Supply and Demand indicator simplifies this process by automatically plotting the supply and demand zones. Dark blue zones indicate the Demand Zone, while maroon zones indicate the Supply Zone.
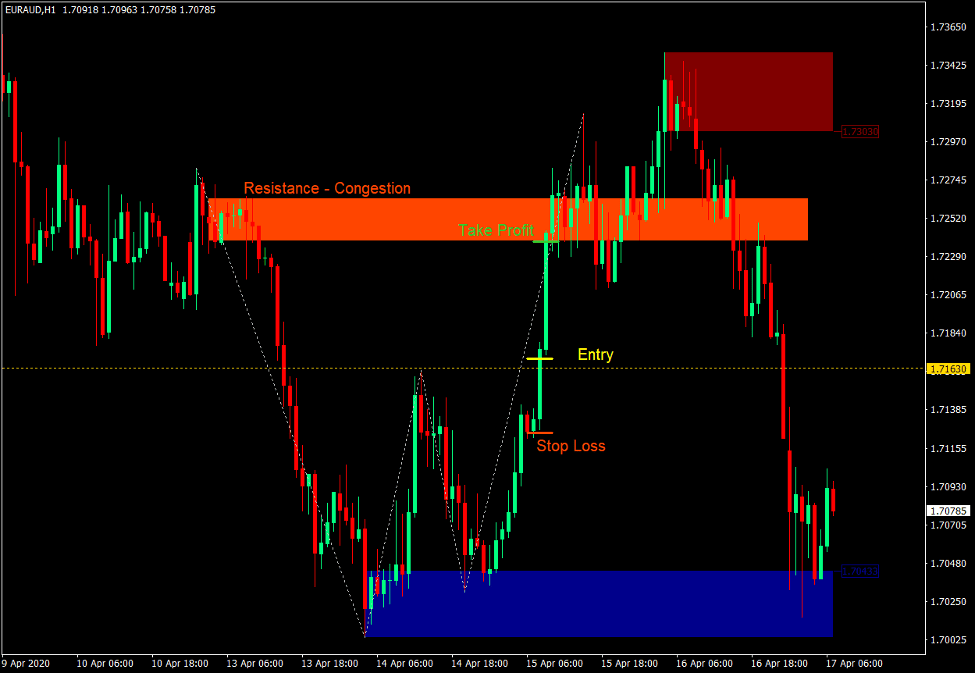
Demand Zone Double Bottom Setup
- Identify a Demand Zone based on the indicator plotting a dark blue zone.
- Identify if a Double Bottom pattern is being formed based on the first two legs of the pattern and the swing low on the demand zone and the shorter swing high leg.
- Wait for price to revisit the Demand Zone and bounce up.
- Enter a buy order as soon as price breaks above the swing high.
- Set the stop loss below the entry candle.
- Set the take profit target on the next resistance level.
Supply Zone Double Top Setup
- Identify a Supply Zone based on the indicator plotting a maroon zone.
- Identify if a Double Top pattern is being formed based on the first two legs of the pattern and the swing high on the supply zone and the shorter swing low leg.
- Wait for price to revisit the Supply Zone and bounce down.
- Enter a sell order as soon as price breaks below the swing low.
- Set the stop loss above the entry candle.
- Set the take profit target on the next support level.
Conclusion
The Double Top and Double Bottom has been a proven trading pattern setup which many pattern traders have made money from. Traders who can effectively identify such patterns can make money from such predictable swing point breakout pattern.
With the use of the Supply and Demand indicator, traders can now easily identify such trade scenarios and make money on these types of patterns.
Recommended MT4 Brokers
XM Broker
- Free $50 To Start Trading Instantly! (Withdraw-able Profit)
- Deposit Bonus up to $5,000
- Unlimited Loyalty Program
- Award Winning Forex Broker
- Additional Exclusive Bonuses Throughout The Year
>> Sign Up for XM Broker Account here <<
FBS Broker
- Trade 100 Bonus: Free $100 to kickstart your trading journey!
- 100% Deposit Bonus: Double your deposit up to $10,000 and trade with enhanced capital.
- Leverage up to 1:3000: Maximizing potential profits with one of the highest leverage options available.
- ‘Best Customer Service Broker Asia’ Award: Recognized excellence in customer support and service.
- Seasonal Promotions: Enjoy a variety of exclusive bonuses and promotional offers all year round.
>> Sign Up for FBS Broker Account here <<
Click here below to download:


